Showing posts with label Azure. Show all posts

Sunday, March 20, 2022

Publish docker image to Azure container registry

Description: In the previous blog, We  have created Dotnet core application container image and run it. In this topic, We are going to publish that image into Azure container registry for use it for my other team members.

Procedure:

First we are going to create Azure container registry, open the azure portal and navigate to container registry service and click on create. Fill all the details and create it 


Once the registry created take ssh console of docker instance tools to publish image. Run below commands to install azure command line tools.

// Install the Azure command line interface # curl -sL https://packages.microsoft.com/keys/microsoft.asc | \ gpg --dearmor | \ sudo tee /etc/apt/trusted.gpg.d/microsoft.asc.gpg > /dev/null # AZ_REPO=$(lsb_release -cs) echo "deb [arch=amd64] https://packages.microsoft.com/repos/azure-cli/ $AZ_REPO main" | \ sudo tee /etc/apt/sources.list.d/azure-cli.list # apt-get update # apt-get install azure-cli

After install the command line utility Login Azure login using az login command, it will pop up for user login 


Browse the url https://login.microsoftonline.com/common/oauth2/deviceauth and paste the device code as define above on screen to authorize


Once you login you will get below result on ssh machine


login the azure container registry using below command 

# az acr login --name techserver

Note:  techserver = azure container registry name


Tag the local container image with Azure container registry name

# docker tag techservercoreapp techserver.azurecr.io/techservercoreapp

Push the container image to Azure registry and you will find the image in the container repo list

# docker push techserver.azurecr.io/techservercoreapp


Test the container registry Image: To test the image, now we are going to create container in Azure using above created and uploaded image in azure container registry create it. 


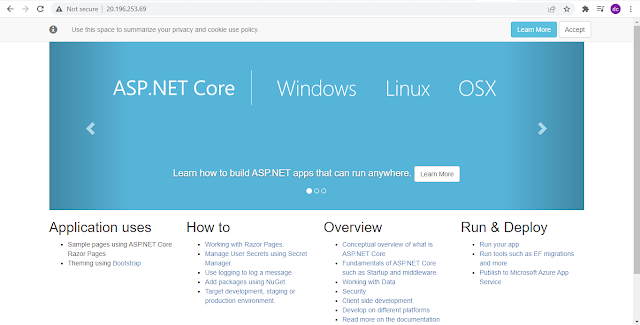
Once the container created browse the Public IP in browser


Friday, March 18, 2022

Deploy Azure App using Azure DevOps from Github source code repository [CI/CD]

Description: Here I have explained, How to deploy Dot net core application in Azure App service using Git source code repository with CI/CD pipeline with manual and automatic trigger.

Pre-requisites:

  • Dotnet core sample application on Git Repo [harpal1990/VSCoreNew]
  • Azure Application [In this example https://serverapprunner.azurewebsites.net]

Create Release pipeline in Azure Devops for Continuous Integration

Open https://dev.azure.com/  navigate to pipelines and click on New Pipeline


Select the source code, for this example I am selecting github as my source code repo is uploaded on it


It will automatically list the repo from your link git account as follow, select your repository


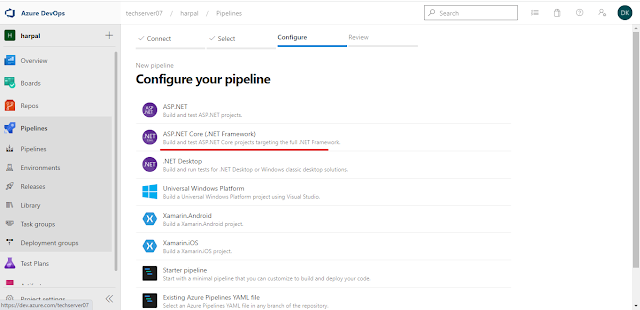
Select framework for pipeline deployment, Here I am use ASP.Net Core 


It will generate azure-pipeline.yml file which include full deployment. In which I am removing test configuration from the bottom

Settings: - task: VSTest@2 inputs: platform: '$(buildPlatform)' configuration: '$(buildConfiguration)'

After removing testing configuration add Task for build the artifacts "Publish build artifacts"


Add artifacts on pipeline at bottom of yaml file


Your complete yaml file for pipeline looks like follow:

# ASP.NET Core (.NET Framework) # Build and test ASP.NET Core projects targeting the full .NET Framework. # Add steps that publish symbols, save build artifacts, and more: # https://docs.microsoft.com/azure/devops/pipelines/languages/dotnet-core trigger: - master pool: vmImage: 'windows-2022' variables: solution: '**/*.sln' buildPlatform: 'Any CPU' buildConfiguration: 'Release' steps: - task: NuGetToolInstaller@1 - task: NuGetCommand@2 inputs: restoreSolution: '$(solution)' - task: VSBuild@1 inputs: solution: '$(solution)' msbuildArgs: '/p:DeployOnBuild=true /p:WebPublishMethod=Package /p:PackageAsSingleFile=true /p:SkipInvalidConfigurations=true /p:DesktopBuildPackageLocation="$(build.artifactStagingDirectory)\WebApp.zip" /p:DeployIisAppPath="Default Web Site"' platform: '$(buildPlatform)' configuration: '$(buildConfiguration)' - task: PublishBuildArtifacts@1 inputs: PathtoPublish: '$(Build.ArtifactStagingDirectory)' ArtifactName: 'drop' publishLocation: 'Container'

Click on Save and Run to execute Release pipeline, Add your commit message and run


Once the pipeline run successfully, you will get output as follow


Now I am going to create Release pipeline for Continuous Deployment / Continuous Delivery

Continuous Deployment: It means once new changes in source code [as per yaml trigger] it will automatically deploy code on end infrastructure like Web APP, virtual machine or Docker container etc,

Continuous Delivery: It means once new changes in source code  [as per yaml trigger] it will ask to deploy code on end infrastructure manually like  Web APP, virtual machine or Docker container etc,

Navigate to Release and click on create New pipeline 


Once you click on new pipeline, it ask for select template for deployment. So for this example I am selecting Azure App service deployment


Once you select Azure App, need to fill Azure Subscription and App name as follow and click on save


After click on save click on pipeline, to add the artifacts 


Add artifacts for publish


This is manual trigger process for Continuous Delivery as I didn't use automatic trigger in artifacts. Click on create release 


After click on create you will find some process for initial deployment


Once process will completed, you will get message like succeed as follow


Now browse the WebAPP url https://serverapprunner.azurewebsites.net/


Now change release /build pipeline from manual to automatic, Edit the pipeline and change the trigger from manual to automatic 


Click on save and create new release as follow


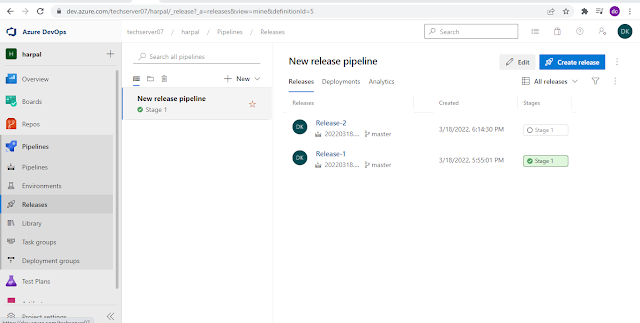
Now we can see 2 release for pipeline


Now, As I am changing on source code it will automatically changed on Web App as well. Change the index page as follow and commit the changes in source code.


After changes, you can see Integration pipeline running automatic and then build/release 


Browse the Azure App url in browser, changes will reflect on browser 


Monday, January 24, 2022

Deploy Docker Container in Azure using Azure CLI

Description: Here I have explained, How to deploy container in Azure using Azure CLI in Windows client machine 

Pre-requisites:

  1. Azure CLI [Download and Install Azure CLI using Link]
  2. Azure Subscription 
  3. Docker Hub install in  Windows Machine [Download and Install using Link]
Run the Docker Container on ACI

  • The first step is to login into Azure using Azure CLI using az login command and it will pop-up for username and password for Azure login
  • Once you log in successfully, it will redirect to CMD 
  • After logging in to Azure, first, we need to create a list of the Azure ACI context using docker context list command
    Note: 
    Docker has the concept of context, it is the place where you can run the docker containers 
  • Create the ACI context using the following

$ docker context create aci servertechaci Here,
servertechaci:
Name of the ACI

  • Once we enter the above command it will ask for the subscription, if there is only one then docker uses it. After that need to select Resource Group 


  • After creating context you can list it and verify 
Run container on ACI: After creating ACI you can run the container using command or using compose file

  • Run container manually: using the below command you can create a container manually
docker --context servertechaci run -d --name web -p 80:80 harpalgohilon/opensource:httpd


Once the container is created successfully, you will receive the container in the list


Also, browse the URL from container Public IP


  • Run container using compose file: Below is the compose file to run apache on port 80 using docker image
  • Create compose file and save as test.yml
version: '3.8' services: apache2: image: harpalgohilon/opensource:httpd ports: - "80:80"
  • Run the compose file using the below command
docker compose -f test.yml up -d


Thursday, January 20, 2022

Use Azure Key Vault in Terraform to create Virtual machine

Description: In the previous blog, We have explained how to create a virtual machine in Azure using Terraform. But We have used passwords in plain text. So here We are going to use Azure Key vault in the same script instead of a plain text password.

Create Azure Vault: The first step to create an Azure vault secret for password

Open the key vault service from Azure Portal and create a key vault


Fill in all the required details and create it 


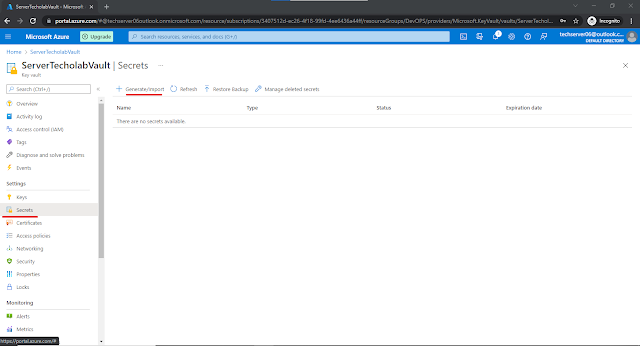
Once the vault is created, create secret for user password. To create a secret open vault then navigate to a secret --> Generate/Import 


Create a secret and fill in all the details like secret name, password etc..

Once the vault and secret has been created, we will use them in our terraform project file as follow

data "azurerm_key_vault" "keyvault" { name = "ServerTecholabVault" resource_group_name = "DevOPS" } data "azurerm_key_vault_secret" "vmsecret" { name = "servertecholabsecret" key_vault_id = data.azurerm_key_vault.keyvault.id }

Here,
Keyvault Name:   ServerTecholabVault
SecretName:         servertecholabsecret

Also, We need to define in admin_password under OS  profile segment as follow:

os_profile { computer_name = "HarryVM" admin_username = "serverapprunner" admin_password = "data.azurerm_key_vault_secret.vmsecret.value" }

Here is the  Full combine file to create VM including password vault and secret configuration
variable "storage_account_name" { type=string default="serverstorage" } variable "network_name" { type=string default="testnetwork" } variable "vm_name" { type=string default="ServerTechVM" } provider "azurerm"{ version = "=2.0" subscription_id = "XXXX-XXXXX-XXXXX-XXXXX-XXXX-XXXXXX" tenant_id = "XXXX-XXXXX-XXXXX-XXXXX-XXXX-XXXXXX" features {} } data "azurerm_key_vault" "keyvault" { name = "ServerTecholabKeyVault" resource_group_name = "DevOPS" } data "azurerm_key_vault_secret" "vmsecret" { name = "servertecholabsecret" key_vault_id = data.azurerm_key_vault.keyvault.id } resource "azurerm_virtual_network" "staging" { name = var.network_name address_space = ["10.0.0.0/16"] location = "East US" resource_group_name = "DevOPS" } resource "azurerm_subnet" "default" { name = "default" resource_group_name = "DevOPS" virtual_network_name = azurerm_virtual_network.staging.name address_prefix = "10.0.0.0/24" } resource "azurerm_public_ip" "myvm1publicip" { name = "pip1" location = "East US" resource_group_name = "DevOPS" allocation_method = "Dynamic" sku = "Basic" } resource "azurerm_network_interface" "interface" { name = "default-interface" location = "East US" resource_group_name = "DevOPS" ip_configuration { name = "interfaceconfiguration" subnet_id = azurerm_subnet.default.id private_ip_address_allocation = "Dynamic" public_ip_address_id = azurerm_public_ip.myvm1publicip.id } } resource "azurerm_virtual_machine" "vm" { name = var.vm_name location = "East US" resource_group_name = "DevOPS" network_interface_ids = [azurerm_network_interface.interface.id] vm_size = "Standard_DS1_v2" storage_image_reference { publisher = "Canonical" offer = "UbuntuServer" sku = "18.04-LTS" version = "latest" } storage_os_disk { name = "osdisk1" caching = "ReadWrite" create_option = "FromImage" managed_disk_type = "Standard_LRS" } os_profile { computer_name = "HarryVM" admin_username = "serverapprunner" admin_password = data.azurerm_key_vault_secret.vmsecret.value } os_profile_linux_config { disable_password_authentication = false } }

After creating file run terraform init then terraform plan and terrafom apply commands to create Virtual machine. You will find all the resources as follow


Also verify by login using same credentials which defines in Password Vault


Wednesday, January 19, 2022

Create Virtual Machine in Azure Using Terraform

Description: Here I have explained, How to create a Virtual Machine in Azure using Terraform. I have broken the whole procedure into multiple sections as follow:

  1. Create Terraform File 
  2. Define Variables 
  3. Create AzureRM provider in terraform
  4. Define Virtual Network and Subnet 
  5. Define New Public IP address
  6. Define Network Interface for VM 
  7. Define Virtual Machine 
  8. All define in one File
  9. Build VM using terraform 
  10. Result after Deployment

1. Create Terraform File: Create one terraform file with name main.tf 

2. Define Variables: Define variables in terraform file 

variable "storage_account_name" { type=string default="serverstorage" } variable "network_name" { type=string default="testnetwork" } variable "vm_name" { type=string default="ServerTechVM" }

3. Create Azure RM provider: Add Azure RM provider in file 

provider "azurerm"{ version = "=2.0" subscription_id = "XXXX-XXXXX-XXXXX-XXXXX-XXXXX-XXXXX" tenant_id = "XXXX-XXXX-XXXXX-XXXX-XXXX-XXXXX-XXX" features {} }

4. Define Virtual Network and Subnet

resource "azurerm_virtual_network" "staging" { name = var.network_name address_space = ["10.0.0.0/16"] location = "East US" resource_group_name = "DevOPS" } resource "azurerm_subnet" "default" { name = "default" resource_group_name = "DevOPS" virtual_network_name = azurerm_virtual_network.staging.name address_prefix = "10.0.0.0/24" }

5. Define the Public IP address

resource "azurerm_public_ip" "myvm1publicip" { name = "pip1" location = "East US" resource_group_name = "DevOPS" allocation_method = "Dynamic" sku = "Basic" }

6. Define Network Interface for VM

resource "azurerm_network_interface" "interface" { name = "default-interface" location = "East US" resource_group_name = "DevOPS" ip_configuration { name = "interfaceconfiguration" subnet_id = azurerm_subnet.default.id private_ip_address_allocation = "Dynamic" public_ip_address_id = azurerm_public_ip.myvm1publicip.id } }

7. Define Virtual Machine 

resource "azurerm_virtual_machine" "vm" { name = var.vm_name location = "East US" resource_group_name = "DevOPS" network_interface_ids = [azurerm_network_interface.interface.id] vm_size = "Standard_DS1_v2" storage_image_reference { publisher = "Canonical" offer = "UbuntuServer" sku = "18.04-LTS" version = "latest" } storage_os_disk { name = "osdisk1" caching = "ReadWrite" create_option = "FromImage" managed_disk_type = "Standard_LRS" } os_profile { computer_name = "ServerTechVM" admin_username = "serverapprunner" admin_password = "P@ssw0rd123" } os_profile_linux_config { disable_password_authentication = false }


8. All define in one File: 

variable "storage_account_name" { type=string default="serverstorage" } variable "network_name" { type=string default="testnetwork" } variable "vm_name" { type=string default="ServerTechVM" } provider "azurerm"{ version = "=2.0" subscription_id = "XXXX-XXXXX-XXXXX-XXXXX-XXXXXX" tenant_id = "XXX-XXXXX-XXXXX-XXXXXX-XXXXX" features {} } resource "azurerm_virtual_network" "staging" { name = var.network_name address_space = ["10.0.0.0/16"] location = "East US" resource_group_name = "DevOPS" } resource "azurerm_subnet" "default" { name = "default" resource_group_name = "DevOPS" virtual_network_name = azurerm_virtual_network.staging.name address_prefix = "10.0.0.0/24" } resource "azurerm_public_ip" "myvm1publicip" { name = "pip1" location = "East US" resource_group_name = "DevOPS" allocation_method = "Dynamic" sku = "Basic" } resource "azurerm_network_interface" "interface" { name = "default-interface" location = "East US" resource_group_name = "DevOPS" ip_configuration { name = "interfaceconfiguration" subnet_id = azurerm_subnet.default.id private_ip_address_allocation = "Dynamic" public_ip_address_id = azurerm_public_ip.myvm1publicip.id } } resource "azurerm_virtual_machine" "vm" { name = var.vm_name location = "East US" resource_group_name = "DevOPS" network_interface_ids = [azurerm_network_interface.interface.id] vm_size = "Standard_DS1_v2" storage_image_reference { publisher = "Canonical" offer = "UbuntuServer" sku = "18.04-LTS" version = "latest" } storage_os_disk { name = "osdisk1" caching = "ReadWrite" create_option = "FromImage" managed_disk_type = "Standard_LRS" } os_profile { computer_name = "HarryVM" admin_username = "serverapprunner" admin_password = "P@ssw0rd123" } os_profile_linux_config { disable_password_authentication = false } }


9. Build Virtual Machine using Terraform

Upload the main.tf file to Azure Cloud Shell as mentioned in the previous blog

Run terraform init command in Azure Cloud Shell


Run terraform plan command to create a plan 


Run terraform apply to run the project 


After Deployment successfully you can find the resources in Azure Portal


Verify the configuration and ssh connection from the Azure portal and ssh connection