Showing posts with label Azure. Show all posts

Thursday, November 28, 2024

Azure Kubernetes Service (AKS): Creating and Connecting AKS Cluster

Description:  In this blog, we are going to discuss about the blow point


  • Azure Kubernetes Service (AKS)
  • AKS features and benefits
  • Steps to Create Kubernetes Cluster in Azure
  • Connect to the Azure Kubernetes Cluster


Azure Kubernetes Service (AKS)

Azure Kubernetes Service (AKS) is a managed Kubernetes service where Azure manages the master node, while end users are responsible for managing the worker nodes.

With AKS, users can deploy, scale, and manage Docker containers and container-based applications across a cluster of container hosts. A key advantage of AKS is its cost-effectiveness—you only pay for the worker nodes in your clusters, not for the master nodes.

Clusters can be created using various methods, including:

  • The Azure portal
  • The Azure CLI
  • Template-driven deployment options, such as Azure Resource Manager templates and Terraform

AKS Features and Benefits

  • Managed Kubernetes: AKS is a fully managed Kubernetes service provided by Microsoft Azure. It eliminates the need for manual setup, configuration, and maintenance of Kubernetes clusters. Microsoft takes care of the underlying infrastructure, including control plane management, security patches, and updates, allowing you to focus on deploying and managing your applications.
  • Scalability and Elasticity: AKS enables horizontal scaling of applications by automatically adjusting the number of pod replicas based on workload demands. It supports dynamic scaling to handle increased traffic or resource requirements, ensuring optimal performance and resource utilisation.
  • Integrated Developer Tools: AKS seamlessly integrates with Azure DevOps and other popular development tools, facilitating continuous integration and continuous deployment (CI/CD) workflows. It provides integrations with Azure Container Registry (ACR) for easy container image storage and deployment.
  • High Availability and Reliability: AKS provides built-in high availability features, such as multiple availability zones (in supported regions), cluster auto-repair, and automatic upgrades. These features help ensure that your applications are resilient and available even in the event of infrastructure failures or planned maintenance.
  • Security and Compliance: AKS incorporates Azure security features, including Azure Active Directory integration, role-based access control (RBAC), and network security groups. It helps secure your containerised applications and data, ensuring compliance with regulatory requirements.
  • Monitoring and Diagnostics: AKS integrates with Azure Monitor, Azure Log Analytics, and other monitoring tools, providing visibility into your cluster’s health, performance, and logs. You can monitor container metrics, view logs, and set up alerts for proactive issue detection and troubleshooting.
  • Hybrid and Multi-Cloud Support: AKS enables hybrid and multi-cloud deployments by integrating with Azure Arc. This allows you to manage and govern AKS clusters across multiple environments, including on-premises and other cloud providers.


Steps to create Kubernetes cluster in Azure

 There are multiple ways to create the Kubernetes cluster in Azure 

  • Azure Portal
  • Azure CLI
  • Azure PowerShell
  • Using template-driven deployment options, like Azure Resource Manager templates and Terraform


In this blog, we are going to create using Azure portal.  

First step to search for Kubernetes in the Azure portal, click on Kubernetes Services


Click on + Create ==> Kubernetes Cluster 


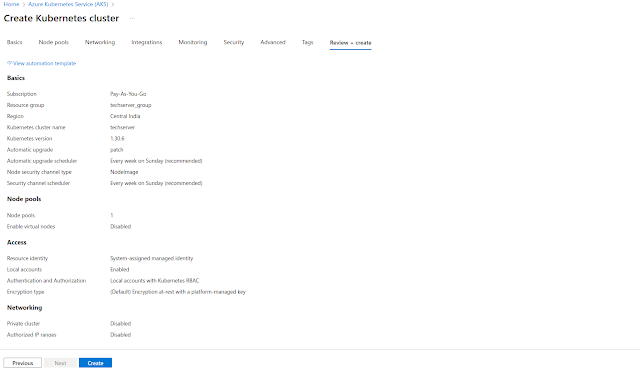
Update all the required details 


  • Give the Resource Group name as per your requirement.
  • Specify a name to your cluster in the Kubernetes cluster name field.
  • Choose a Region in which you want to create your AKS cluster. In the specified region, our master node will be created.
  • Based on the region the select the availability zones.
  • Select the Kubernetes Version.  Here I am choosing the default, i.e., 1.30.6


Select Node Pools configuration instance type


change the size of node size to D2s v3 or as per your requirement and Min- Max  node count 


Change the network configuration as per requirement 


Setup Integration with container registry 


Setup the monitoring 


Security 


Advance 


Review + Create 


Once it will created you will get the below screen 


Click on Go to resource where you get the kubernetes service 


Click on connect to get instruction to connect the service , in this demo i m going to use azure cli 


After configure all the command run the kubernetes command, you will get the results 

$ kubectl get nodes


For test purpose just deployed nginx pod 


You can list out the node pool


Congratulations, you can use AKS

Wednesday, January 24, 2024

How to Deploy a Dockerized React App Using Azure DevOps Pipelines

Description:  In this topic I am going to explain, How to setup React Application to Docker Image and upload image to Azure ACR [Azure Container Registry] to deploy the Dockerized React APP to Azure App service 


Prepare the React Application

First I am setting up the React Application using command line 

# mkdir reactapp

# cd reactapp

# npx create-react-app react-app   [react-app is the application folder name]

Above command will create the folder with react-app, after created enter into folder and start the deployment server

# npm start

Dockerizing the Reactapp

Create the Dockerfile in webroot folder as follow

FROM node:18 AS build WORKDIR /app COPY package.json package-lock.json ./ RUN npm install COPY . ./ RUN npm run build # Step 2: Serve the application using Nginx FROM nginx:alpine COPY --from=build /app/build /usr/share/nginx/html EXPOSE 80 CMD ["nginx", "-g", "daemon off;"]

Create .dockerignore file as follow to remove unwanted content upload into docker file as follow


node_modules build .dockerignore Dockerfile .git .gitignore
Create the Docker Image 

After creating both the files now create the image from the Dockerfile

# cd react-app 
# docker build -t my-react-app .

Validate the image by create the container from the above image and run the application using port 80

# docker run -p 80:80 my-react-app


Upload Changes to GitHub Repository: After verifying the URL upload changes to Github with new repo.
Git Repo : https://github.com/harpal1990/node18new

Deploying React App To Azure: To deploy create the ACR [Azure Container Registry] and Azure App service with Docker Container Running on Linux 


Setup Azure Container Registry

To Setup ACR -- Search for the service called Container Registries -- click on Create Container Registry


Filled all the require details and click on Create


After ACR created navigate to ACR --> Access Key and ticked the Admin User that will generated username and Password for the ACR


After ACR created upload the local machine container image to ACR using command line Install azuer cli using below command # apt install aws-cli Login into azure and upload the local image

# az login --use-device-code Above command will generate the device code like as follow To sign in, use a web browser to open the page https://microsoft.com/devicelogin and enter the code IKDD9SFVS to authenticate.

After login into Azure now login into ACR using below command # az acr login --name reactapptechserverglobal 


Tag the existing image with azure ACR #docker tag my-react-app reactapptechserverglobal.azurecr.io/my-react-app:v1 Push the image to ACR


# docker push reactapptechserverglobal.azurecr.io/my-react-app:v1


Create the Azure App with container: To create the Azure App with container navigate to Azure app service

Click on Create the Webapp and fill all the details as follow Select Docker Container and location same as ACR [i.e. East US 2]


Select the Registry, image and tag for the Web APP


After filled all the details click on Review + Create. Once the process completed check the URL of the Web App you will get the out put of the react


To validate the configuration open the Azure App -- > Setting you will get all the details regarding the ACR details


Setup AzureDevops Project: Create the Project in Azure DevOps and setup pipeline


Select the source code location as Git and I am selecting my Repository which I have prepared at beginning On configure Tab I am going to select Build and Push image to Docker registry


Once you validate it will generate the yaml file validate the following things from the yaml file


# Docker # Build and push an image to Azure Container Registry # https://docs.microsoft.com/azure/devops/pipelines/languages/docker trigger: - main resources: - repo: self variables: # Container registry service connection established during pipeline creation dockerRegistryServiceConnection: 'acf4f71d-f988-4c52-a365-24525e269fb0' imageRepository: 'harpalnodenew' containerRegistry: 'reactapptechserverglobal.azurecr.io' dockerfilePath: '$(Build.SourcesDirectory)/Dockerfile' tag: '$(Build.BuildId)' # Agent VM image name vmImageName: 'ubuntu-latest' stages: - stage: Build displayName: Build and push stage jobs: - job: Build displayName: Build pool: vmImage: $(vmImageName) steps: - task: Docker@2 displayName: Build and push an image to container registry inputs: command: buildAndPush repository: $(imageRepository) dockerfile: $(dockerfilePath) containerRegistry: $(dockerRegistryServiceConnection) tags: | $(tag)

Click on Save and Run. Once the build piepline run successfully, it shows the output


You will get changes on The Azure APP

Thursday, July 14, 2022

Azure Pipeline to Publish dotnet core project to Azure Container Registry

Description: Here I have explain, How to build azure pipeline to publish dotnetcore project to Azure container registry for Docker container with Github Repository.

Setup:

  1. Github Repository with Dotnet core code [https://github.com/harpal1990/corewithdocker.git]
  2. Azure Container Registry
Procedure:

First I am going to create Dockerfile in Github repository to create and deploy docker container during the pipeline execution.

Create file with name Dockerfile [Name is case sensitive]

FROM mcr.microsoft.com/dotnet/core/sdk:3.1 AS build-env WORKDIR /app # Copy csproj and restore as distinct layers COPY *.csproj ./ RUN dotnet restore # Copy everything else and build COPY . ./ RUN dotnet publish -c Release -o out # Build runtime image FROM mcr.microsoft.com/dotnet/core/aspnet:3.1 WORKDIR /app COPY --from=build-env /app/out . ENTRYPOINT ["dotnet", "docker-app.dll"]

Screenshot from the Github repository


Create Azure Container Registry:  To create Azure container registry navigate to Container Registries and click on Create icon.

Fill all the require details as follow and click on Review + create


After created container registry successfully, navigate to resource and allow access key for admin access to upload image and use in Azure container.


Setup Build Pipeline: After setup container registry, create build pipeline to take source code from github repository and build image to upload on Azure container registry.

Open Azure Devops console and navigate to Pipeline --> New Pipeline 


After click on Github --> Select the Repository from the Github list, Once you select the repository. By analyse the source code repo, it will shows Docker option for deployment. So here I am going to select 
Docker [Build and Push image to Azure Container Registry]


After click on Docket it popup to select Azure subscription, after select you can list the Azure container registry. 


After click on valid and configue, it will create azure-pipelines.yml file as follow, where you can validate the configuration. Click on Save and run to trigger the pipeline


After click on Run, if everything is OK then it show successful message as follow


To Verify the pipeline result, Open Azure Container Registry we can find the Instance image as follow:


For test the image, I am going to create one docker container using the above created image in registry
To create docker container, navigate to Container instance in azure and click on create container.

After filled all the details like follow and create it


Once the container created, browse the public IP in browser for verification


Test the Pipeline: For testing the Azure pipeline, first i am going to stop the container. Then change something on index file as follow and click on commit.


Once you click on commit, Pipeline automatically triggered


Once Job executed successfully, you will get the result as follow


Now I am going to start the container and browse the IP address again, you will get updated content 


Thursday, July 7, 2022

Azure Pipeline to setup Dotnet core application to IIS server using Azure DevOPS

Description: Here I have explained, How to setup .net core application from github source code repository to Microsoft IIS server through Azure DevOPS using Deployment Group.

Setup:

  • IIS server 
  • .net core hosting bundle [install 6.0 for this post] download link
IIS


Dotnet Core 6.0 Hosting Bundle


Setup Deployment Group:


After setup both the things on IIS server, Now need to setup deployment group from Azure DevOPS. In Azure DevOps select the Organization and navigate to Pipeline --> Deployment Group --> Availability Pools --> Add new


Give Name to Target group and select windows [Type of registrar]. Copy the command by click on copy script to clipboard 


Run copied command to IIS server in Power shell by Run as administrator


As mentioned in the above figure, while registering the agent it will prompt for several requirements.


Enter Authentication Type [PAT]   
PAT [Personal Access Token need to generate from the User setting and click on PAT


Create new token and select Deployment groups in permission tab as follow and save the token. Also keep the token to notepad for reference 


Enter replace →y
Group tags → y
Add tags → dev, prod (to specify the scope the deployment group will be handling we using tags)
Add credentials we used while creating the vm as we are logged in to the vm through that account.


After run above command if connection established successfully, then you can get status (Online)


Setup Build Pipeline: 

To setup build pipeline using github repository, open Azure devops and navigate to Pipeline and create new pipeline 


Select Github and source code and  use repository for dotnet core [https://github.com/harpal1990/VSCoreNew.git]

Once you select repository, according to source code it ask to select framework where you want to deploy the application. So in our case, I am selecting ASP.Net Core (.Net Framework)

Once you select repository, it will automatically create azure-pipelines.yml file. To publish the artifact need to add stage for same and add it to yml file then click on save and run


Once Pipeline created click on save and run, it will create artifact of the source code. After it navigate to Release pipeline and click on new pipeline 


Create Empty Job and give name to it. First add artifact created from the build pipeline and click on continuous deployment trigger to enable it.


After add the artifact, Add task --> Add deployment group Job --> fill all the require details and add deployment group


After adding deployment group, click on + sign and add IIS web app deploy and IIS web app manage both the tasks.


After add both the task configure both of them one by one. 

First click on IIS Web app deploy and fill the require details like Website Name. Also ticked on Take App Offline


Now click on Manage IIS Website step and give Website name [For this example I have used Default Web Site]


After fill all the details save the pipeline and click on create release. Once release created the pipeline executed automatically and if not face any error then it show release run successfully message


Before executing the pipeline web server on default site:


After executing pipeline web server default page