Description: Here I have explained, what is Amazon EKS? How to deploy Kubernetes Cluster with Amazon EKS
What is Amazon EKS?
Amazon EKS [Elastic Container Service for Kubernetes] is the managed Kubernetes service which allows you to run Kubernetes on AWS. In the cloud, Amazon EKS automatically manages the availability and scalability of the Kubernetes control plane nodes responsible for scheduling containers, managing application availability, storing cluster data, and other key tasks.
Prerequisites
Below are the prerequisites to setup Amazon EKS
- AWS CLI: You will need version 1.16 at least. Follow the URL for setup and version details
- Kubectl: This command is used for communicating with the cluster API server. Refer URL to setup and version details
- AWS IAM Authenticator: To allow authentication with kubernetes cluster need to setup IAM user for kubernetes
AWS EKS ROLE: First we need to setup EKS role in IAM. To create the IAM role perform the below steps
- Open IAM service in AWS and navigate to Roles
- Click on Create role

- Filled all the required details in form, Select AWS Service, in service use case select EKS and select EKS-cluster in specified service as in screenshot

- You will get the permission list in the review page

- Give name the cluster "eksClusterRole" and validate the trust entities as screenshot and create the role

AWS IAM User: After creating AWS EKS role with eksClusterRole name now we need to create and setup IAM user in the local machine to run the AWS commands
- To create the user navigate to IAM --> Users --> Create User
- Fill all the required details and create the user with Administrator access privileges and EKS service privileges
- In the example I create user with the name AWSEKSUSER
- After create the user I am going to add access key to access the AWS APIs using CLI. So navigate to the user properties and click on create Access Keys. Make sure to download the csv file of credentials
- Once the user created setup user in local instance AWS CLI using aws configure command line utility


You can verify the version of kubectl using kubectl version command
Rolename: AmazonEKSNodeRole

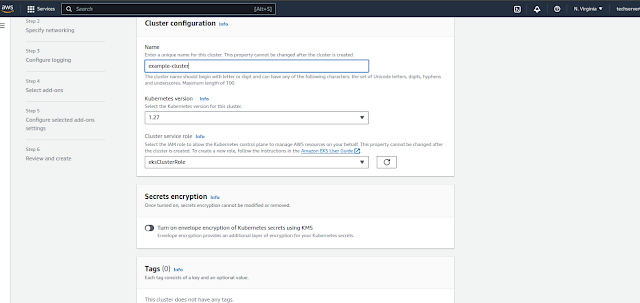
- Navigate to EKS service in AWS and click on Add Cluster
- It will pop-up form to create the cluster filled all the required details and select eksClusterRole which we have created previously
- Need to select VPC and subnets, So in this example we used default VPC in us-east-1 region
- Select public interface for cluster
- Now select the element which you want to enable the logs. But in the example I am not going to enabled anything
- Select the add-ons which need to add with the setup. So I am taking the default add-ons
- Select the version for each add-ons. In this example I used the default versions
- Review the details and click on create. It will take around 20 minutes so wait until the process completed.
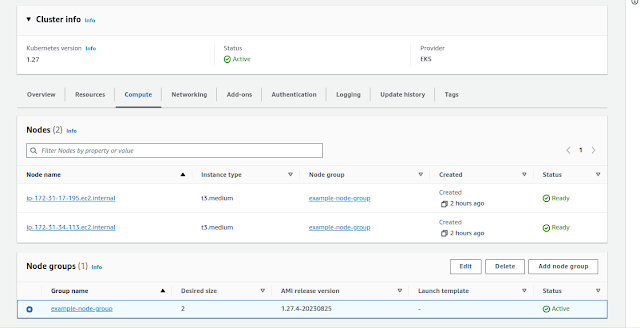
- Once the process completed you will find active status in cluster


- To create the node group navigate to newly created cluster --> Compute tab
- Under Compute tab option to create "Add node group"
- Once you click on Add node group you will find form for the node. You need to fill node-group name and IAM role which created for node and click on next
- Next step to Set configuration for node group. Fill all required details like AMI, instance type, scaling configuration etc. In this example I used Amazon EC2 AMI, t3.Medium instance type, disk size 20 GB and scaling group 2 for each
- Next select the sub nets included in node. It will automatically selected the required sub nets.
- Review all the details and click on create. It also took few minutes to create it
- Once the node group created it shows in active status


$ aws eks --region us-east-1 update-kubeconfig --name example-cluster
Note: In above command need to change the region and the name of the cluster. In this example we created cluster with the name example-cluster. Once the command executed the configuration exported to .kube/config file


https://github.com/harpal1990/k8-application.git
once repository checkout navigate to k8s-specifications directory under repo. You will find different files relevant to kubernetes application


$ kubectl get deployments,svc

In the above screenshot we can see all the services pod up and running with 2 load balancer type service
http://a25ca28a3348a407e8bdd3f912145b48-1964993370.us-east-1.elb.amazonaws.com/

http://a8a7f7a6a4e4044dd89c1f08ecb5707c-548992896.us-east-1.elb.amazonaws.com/

So in this way we can deploy kubernetes application to Amazon EKS
