Showing posts with label Terraform. Show all posts

Sunday, September 17, 2023

Github integration with Terraform cloud to driven workflow using VCS

Description: Here I have explained, How to integrated GitHub with Terraform cloud to driven the workflow using VCS.  When you integrate the GitHub with terraform cloud your terraform project tf files saved in GitHub repository.  Whenever you make any changes in GitHub files workflow run automatically.

GitHub Repository: 

The first step, we setup blank public repository in GitHub. To create the blank repository navigate GitHub and create blank repository with Readme file 


Clone the newly created repository in local folder using git clone command 

git clone https://github.com/harpal1990/testrepo-tfcloud.git


After clone the repository I am adding  terraform project files in same directory and upload it to repository. So I have uploaded main.tf and install_nginx.sh file as part of my terraform project


Now to push it to repository we need git username and password. So generate git token from the GitHub. To generate GitHub token navigate to user setting in GitHub --> Developer Settings --> Personal access tokens --> Tokens (classic) --> Generate new token 


Once you generated the GitHub token make sure to keep in safe place. If it loss need to regenerate with new name

Once you add the additional files and push to origin branch it asked for password/token as follow


Now push the additional files to GitHub


Workspace: Now after filling all the details create new workspace and select version control workflow


Select GiHub as subversion control system and click on next


Once you click on GitHub it will popup for account authorization


Add all the required repositories for terraform cloud in our example I am using testrepo-tfcloud


After adding the repository you can select the valid repository and click on create workspace 


After creating workspace add variables as follow

After uploaded all files uploaded create the require variables in Terraform cloud. To add variable in terraform cloud navigate to workspace setting --> variable --> create variable set


Add variable -- Create Variable set


First variable add  for region as follow


Now add access key and secret key for authorization to AWS as follow


After applying all the variable set run the task from the workspace and confirm apply 


In EC2 you can find the instance in the list


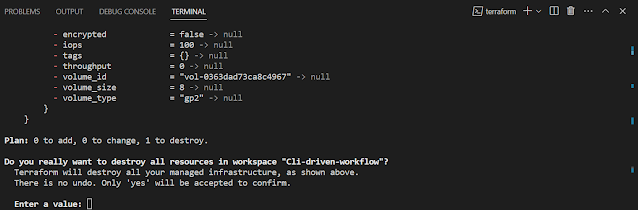
Destruction and Deletion: To remove the instance and workspace follow the below steps

  • Goto -> Workspace -> Settings -> Destruction and Deletion
  • click on Queue Destroy Plan to delete the resources on cloud
  • Goto -> Workspac -> Runs -> Click on Confirm & Apply
  • Add Comment: Approved for Deletion


What is Terraform Cloud and How to run local cli work flow using Terraform cloud

Description: Here I have explained, What is Terraform Cloud and How we can run the workflow with terraform cloud

What is Terraform Cloud?

Terraform Cloud builds on these features by managing Terraform runs in a consistent and reliable environment instead of on your local machine. It securely stores state and secret data and can connect to version control systems so that you can develop your infrastructure using a workflow similar to application development.

The Terraform Cloud UI provides a detailed view of the resources managed by a Terraform project and gives enhanced visibility into each Terraform operation.

Workflows: Terraform cloud supports three types of workflows for Terraform runs

  • The CLI-driven workflow, which uses Terraform standard CLI tools to execute runs in Terraform Cloud
  • The UI/Version Control System(VCS)-driven workflow, in which changes pushed to version control repositories trigger runs in the associated workspace
  • The API-driven workflow, allows you to create tooling to interact with the Terraform Cloud API programmatically


Signup with Terraform Cloud: To signup with terraform cloud use this URL


First Workflow: The CLI-driven workflow, which uses Terraform standard CLI tools to execute runs in Terraform Cloud

To run the workflow in terraform first need to generate API token. To generate API token login with terraform cloud and navigate to user setting and create token


Once you click on Create an API token it will popup for token information as follow. Fill all the details and create token 


Once you click on Generate Token it will create the token keep token on safe place never shared with someone. Also it will not displayed again so if you forgot to copied you need to create new one.

Workspace: After creating the API token now create workspace in terraform cloud to run the projhect from the local cli

To create the workspace navigate to project & workspace and new -->  workspace


Once you click on workspace it will pop-up for select the workflow, in this example I am selecting the cli-driven workflow


After click on CLI workflow filled the required details like name of worflow and select the default-project. 

Note: In this example I used default-project you can create new project and use same


Once you click on create it will shows the code which we need to add in our existing terraform tf file 


After generating the API token now need to login using token in local machine from where you want to run the terraform project


install_nginx.sh file for nginx installation in user_data


  In terminal run the command terraform login to login with the terraform cloud


Once you put input it will ask for the token so paste the token which we have created earlier. You will get user details if token is valid as follow


Now run the terraform commands to run the project with the current directory

$ terraform init


$ terraform plan


When your the terraform plan it also show progress in terraform cloud as well


Once the plan completed you can get the result in terraform cloud as well


After planning now I am going to run the terraform apply


Once you pass Yes, it will run and apply the work flow 


So once  the runs completed it shows as follow


You can see the result like approved using UI or API


So as per our terraform project one EC2 instance created with the nginx role 


Also we can get result by browse the url 


Finally I am going to destroy the infrastructure using terraform destroy 


Confirm and apply to destroy the instance


Once the instance destroyed you will get the output as follow


Sunday, April 10, 2022

Create Multiple EC2 instance with Nginx Role using Terraform

Description: Here I have explained, How to create multiple EC2 instance with Nginx Role using Terraform.

Prerequisites:

  • SSH Key in AWS
  • IAM user with EC2 Full access
  • Default VPC in EC2 instance
First creating provider file provider.tf for region access and secret keys

provider "aws" { region = "us-east-1" access_key = "XXXXXXXXXXXXXXXXXXX" secret_key = "XXXXXXXXXXXXXXXXXXXXXXXXX" }

Define Variables like port, image_id and instance_type in variable file variable.tf  

variable ports { type = list(number) } variable image_id { type = string } variable "instance_type" { type = string }

Variable define in terraform.tfvars

ports=[22,80,443] image_id="ami-04505e74c0741db8d" instance_type="t2.micro"

Define Security group rule in Securitygroup.tf. For inbound port, I have used dynamic block for multiple port numbers define in terraform.tfvars file  "ports=[22,80,443]"
### Creating Security Group ### resource "aws_security_group" "terrainstance" { name = "Web_SG" description = "Security Group for Web" egress { from_port = 0 to_port = 0 protocol = "-1" cidr_blocks = ["0.0.0.0/0"] } dynamic "ingress" { for_each = var.ports iterator = port content { description = "Port for SG" from_port = port.value to_port = port.value protocol = "tcp" cidr_blocks = ["0.0.0.0/0"] } } }


Shell script to install Nginx and start the service

#!/bin/bash apt update apt-get install nginx -y echo "this is techserverglobal" > /var/www/html/index.nginx-debian.html systemctl start nginx systemctl enable nginx

Instance.tf file for launch instance by using all the above variable. Here I define 3 count for 3 instance and name of the instance will be like "NginxWeb-0, NginxWeb-1 and NginxWeb-2"

resource "aws_instance" "terrainstance" { ami = "${var.image_id}" instance_type = "${var.instance_type}" count = 3 key_name = "terraform-key" security_groups = ["${aws_security_group.terrainstance.name}"] tags = { Name = "NginxWeb-${count.index}" } user_data = "${file("nginx.sh")}" }

Plan and Apply terraform project


Verify in AWS console