Showing posts with label Jenkins. Show all posts

Friday, June 17, 2022

Setup Pipeline to Deploy Java Project in Tomcat Docker Container using Jenkins

Description: Here I have explained, How to setup pipeline to deploy Java Project in Tomcat docker container using Jenkins.

Setup:

  • Jenkins Server [localhost]
  • Docker host  [52.12.158.81]
Jenkins Plugin:
  • Publish Over SSH
First I am going to create user for authentication in Docker host and create separate directory to save project ".war" file. Also add that user in docker group, so execute docker command as well.

Create user with home directory and set password 

# useradd dockeradmin -d /home/dockeradmin
# passwd dockeradmin

Here I have use password not key for authentication, so we need to change in sshd configuration file to allow password authentication. 

# vi /etc/ssh/sshd_config

PasswordAuthentication yes  ### set yes to allow user authentication password 

After changes in configuration file restart ssh service

Add dockeradmin user to docker group using below command

# usermod -aG docker dockeradmin

Configure user and docker host in Jenkins 

Open the Jenkins url and navigate to Manage Jenkins --> Configure System --> Publish Over SSH [This option shows only if publish over ssh plugin installed] --> SSH servers [fill all the require details as follow]

Name:                     docker
Host name:              52.12.158.81  [IP address of Docker Host]
Username:               dockeradmin
Remote Directory:  /home/dockeradmin   [user's Home Directory]
Password:                [Set user password]
Port:                         22 [change if custom set]


After save all the details, click on test connection, it shows success if all things perfect.


Create custom Dockerfile for tomcat container

In tomcat container with latest release, when we pull the image and deploy it directly. It showing an 404 error, so to overcome this issue we need to rename webapps.dist to webapps

First I am creating one folder under /opt with name docker and navigate to that folder 

# mkdir /opt/docker

# cd /opt/docker

Create Dockerfile for pull latest tomcat image, then copy webapps.dist to webapps 

# vi Dockerfile
FROM tomcat:latest RUN cp -R /usr/local/tomcat/webapps.dist/* /usr/local/tomcat/webapps COPY ./*.war /usr/local/tomcat/webapps

After save Dockerfile, give permission to dockeradmin user on created folder [/opt/docker] using below command

# chown -R dockeradmin.dockeradmin /opt/docker

Create Maven Project on Jenkins: After setup all the things on docker machine, now I am going to create Maven Project on Jenksins. 

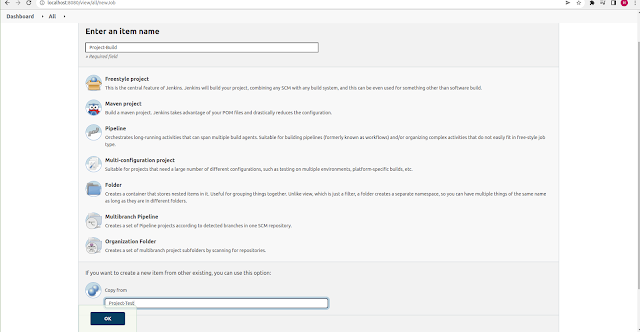
To setup project navigate to Jenkins Dashboard --> New Item 

Fill all required details like Name and select Maven Project


After click on OK, fill the details for the projects like git repo, build trigger, Build Options, SSH details of server etc..

Git Repo:


Build Triggers: In poll SCM, I have set * * * * *, means whenever change occurred on git repository pipeline will executed.


Build Environment:


Build:


Post Steps:

Select docker machine, which we have added before in copy over SSH 


Fill the details for transfer files, remove prefix, Remote Directory [where you want to copy war file after build, So in our case I will copy to /opt/docker directory] which is owned by dockeradmin user 

Source Files : **/*.war  [Jave project build save in war extention]
Remove Prefix : target  [It will remove all the folder prefix, we set this to avoid file path confusion]
Remote Directory : //opt//docker [We must use // double slash]
Exec Command:  Below command will run while pipeline executed.

cd /opt/docker;      [ It will change the Directory to project path]
docker build -t tomcat:v1 .;  [Build the image using Dockerfile, which we have defined before]
docker container stop jenkins; [This command stopped the existing container]
docker container rm jenkins;   [This command remove the container]
docker run -d --name jenkins -p 8080:8080 tomcat:v1 
[This command will create container using the custom image created from dockerfile]


After filled all the above details, click on apply and save. Build the project or change in github repository to automated execute the pipeline.

So for the test, I am change in index.jsp file as follow and commit the changes 


After changes, we can see build automatically trigger


Also verify the URL http://52.12.158.81:8080/SimpleTomcatWebApp 


Any changes occurred on git hub code, automatically trigger the job and it overwrite the container. 

Friday, June 10, 2022

Run Ansible Playbook using Jenkins Pipeline

Description: Here I have explained, How to install Ansible plugin in Jenkins, integrate it and Run Ansible playbook using Jenkins Freestyle Project.


Setup:

  1. Ansible install in same machine as Jenkins
  2. Jenkins with require plugins
  3. Client machine for install Nginx
To run the ansible job from Jenkins, we need  to install ansible plugin from Jenkins 


To login and authentication in Remote client machine, we need to setup user with key in ansible/Jenkins machine. Here in this example, I am using Ubuntu user and generate key using below command.

$ ssh-keygen -t rsa


After running above command you will find 2 key files. One is Private key [id_rsa] and Public Key [id_rsa.pub]  After generating keys, copy public key to destination client machine's  root user  authorisation file.

Here I am going to copy key to root user because, I will use root to login using same user via ansible playbook and install Nginx in destination client server.

Public key file [id_rsa.pub] content looks like as follow:

ssh-rsa AAAAB3NzaC1yc2EAAAADAQABAAABgQDWokq0EqR3F6/aFJRYP2P7vsB1DOORosEgmfB9DYG5cLXKlumCoEonG/uZcvns8zBHAgCfSq/gysj9hMmml6KUWfwl7V6/6ethJrpQc3xIQeSamFiGiCJuz9s57y7O95pq/TL9saLJDi2TvmfheLvtUig98CFEQrW+Bvv0AMwHAsQCCqyGhRhdUlnijVoryXlVBpnMZ1GAbzMSeOrF/9t6pfNOujFw7PPK6a45VafcmHgIpPtnxWOzyf/WhpsZ11l+eezyBMQT14Cv5pYnMLswqi9HazDLwHkz81wu+e34r6Uo5vQB/ViIMOyMVZuKwMAokVH5+NI/M5OJlMmbyQPmlWZdtprrSiD59Nb59lFe0wk5rTYoOm6lXfPCUygKkrPvX/co2/SyOc8/zsAtcRSkbjmi6oK7QXSl8GDa/pXy/g1PH1SAkHHg9/YNQbNW1SlvmvYyMxGLLxRkQ42Hj2k396xMc2G2coXXB4ikxxErhQEqHrnv24J0/TzGykImV0M= ubuntu@ip-172-31-11-49

Copy file content to destination machine's root folder authorized_keys as follow


After copy key, need to setup user credentials in Jenkins. To Setup user open Jenkins console and navigate to Manage Jenkins --> Manage Credentials --> Add Credentials 


Fill details like, username and private key of ubuntu user as follow


After saving the credentials, I am going to create one playbook in ansible for setup Nginx in ansible/jenkins as follow.

Define Host in ansible hosts file as follow:

[server] 172.31.11.49 ## Ip address of client machine in which we are going to setup Nginx 


Please create playbook.yml for install nginx  in client machine

--- - hosts: server remote_user: root tasks: - name: ensure apache is at the latest version apt: name=nginx state=latest

Define Key file location and user details in ansible.cfg [Located on /etc/ansible directory]  as follow. Also I have copied both the key files in Ansible directory. 

[defaults] host_key_checking = False private_key_file = /etc/ansible/id_rsa remote_user = root remote_tmp = /tmp/

After setting up all the above ansible thing, I am going to test the connection from Ansible to client machine using below command 

# ansible -m ping server 


After showing success, I am going to create Free style project in Jenkins. To create project navigate to Dashboard --> New Item --> Give Name of project --> Select Free Style Project


Navigate to Build step and select Add Build Step --> Select Invoke Ansible Playbook


Fill the require details like playbook path, host file path and credentials [setup as previous with private key] and save / apply the project


After setup  project, Open it and click on Build Now 


Once build process completed, Open the output of the build. It looks like as follow


Also we can check the nginx version as follow


Friday, May 20, 2022

Setup Maven Project using Pipeline as code in Jenkins

Description: In the previous blog, We have setup pipeline manually to setup maven project on Tomcat 9. Here I am going to setup Maven project using Pipeline as code as Jenkins file 

Setup:

  1. Jenkins server [localhost]
  2. Tomcat Prod server  [Tomcat URL http://52.23.238.138:8080/]
  3. Tomcat Stage server [Tomcat URL http://54.91.86.53:8080]
  4. Github Project URL : https://github.com/harpal1990/sampletomcat.git
Jenkins Plugins

  1. Maven Integration Plugin 
  2. Build Pipeline Plugin
  3. Copy Artifact Plugin 
  4. Deploy to container Plugin 


Code Editor:
  1. VSCode [JenkinsFile Extension]
Process: As previous blog, we will create 4 Project stage to manage maven project as follow

  1. Project-Test                 == In this Project source code from git cloned and test using maven
  2. Project-Build               ==  In this Project build created after test
  3. Project-Deploy-Stage  == Here deploy build to staging environment with automatic
  4. Project-Deploy-Prod   ==  Here deploy build to Production environment by manual approval
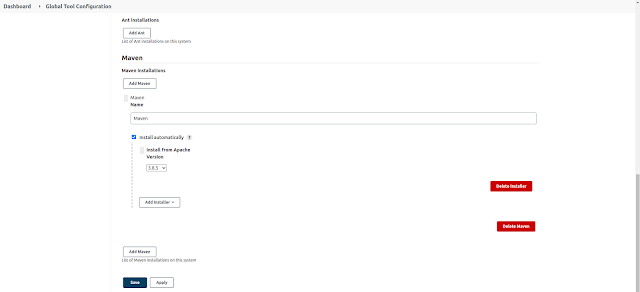
Maven Installation:  To run maven commands, we need to install maven at Jenkins level. To install maven navigate to Global Tool Configuration --> Maven Installation and fill details as follow


Note: Here I have defined maven installation as "Maven" which I will use in code as follow

pipeline{
agent any
tools {
maven 'Maven'
}

After defined maven command, we can use in maven test and build source code as follow

stages{
stage("Project-Test"){
steps{
sh "mvn test"
}
}

stage("Project-Build"){
steps{
sh "mvn package"
}
}

 
Once Test and Build Project completed, Now we need to deploy to stage and Prod instance respectively. In previous blog we used plugin called "Deploy to Container" 

Here to create code for deploy to container, I am going to use "Pipeline Syntax" under build Trigger as follow


Once you click on Pipeline Syntax use Deploy war/ear to container in sample step and fill all the require details as follow


After filled all the details click on Generate Pipeline stage, it will generate code as follow 


Deploy to stage code looks like as follow

stage("Project-Deploy-Stage"){
steps{
deploy adapters: [tomcat9(credentialsId: 'latestcred', path: '', url: 'http://54.91.86.53:8080')], contextPath: '/techserver', war: '**/*.war'
}
}


Same Code use for Production environment just changed the URL and credentials. After fill all the details, I am uploading below code to my github repository with the name of Jenkinsfile

pipeline{ agent any tools { maven 'Maven' } stages{ stage("Project-Test"){ steps{ sh "mvn test" } } stage("Project-Build"){ steps{ sh "mvn package" } } stage("Project-Deploy-Stage"){ steps{ deploy adapters: [tomcat9(credentialsId: 'latestcred', path: '', url: 'http://54.91.86.53:8080')], contextPath: '/techserver', war: '**/*.war' } } stage("Project-Deploy-Prod"){
            
        // Define below for approval
        input{
message "Successfully checked on stage, Should we continue on prod?"
ok "Yes we should"
}
steps{ deploy adapters: [tomcat9(credentialsId: 'latestcred', path: '', url: 'http://52.23.238.138:8080')], contextPath: '/techserver', war: '**/*.war' } } } post{ always{ echo "========always========" } success{ echo "========pipeline executed successfully ========" } failure{ echo "========pipeline execution failed========" } } }

Once file uploaded to git repository, Create new project with Pipeline as follow 


After click ok, select Pipeline script from SCM to deploy from git and give repository URL as follow


After save the pipeline click on Build Now, once build completed it shows result as follow


Here we have deployed on Prod and Staging environment without manual input. So I am going to add manual approval for Production deployment as follow and then try to build again

stage("Project-Deploy-Prod"){
input{
message "Successfully checked on stage, Should we continue on prod?"
ok "Yes we should"
}
steps{
deploy adapters: [tomcat9(credentialsId: 'latestcred', path: '', url: 'http://52.23.238.138:8080')], contextPath: '/techserver', war: '**/*.war'
}
}


After adding Input it will ask for approval as follow. Once you approve it will deploy to prod


After successfully approve, we can check both prod and staging URLs and it shows the output as follow


Wednesday, May 18, 2022

Setup Slave server for Jenkins

Description:  Here I have explained, How to setup Slave server for Jenkins on Ubuntu Machine

Setup:

  1. Master Jenkins : localhost
  2. Slave Machine : 3.90.0.161
Before setup slave server for jenkins, I am going set password for ubuntu user and create one folder for slave jenkins file. In this example I used /var/jenkins


Install java in slave Jenkins server using below command

# apt install java-jre
 

After create user and jenkins directory on slave, Open jenkins url navigate to Manage Jenkins --> Manage Node and Cloud --> New Node


After click on create button fill all the require details like name, Remote Directory, Usage, Launch Method, Host and credentials of slave machine.

Note: Host key Verification Strategy set : Non Verifying Verification Strategy


After fill all the details click on launch the agent, wait for some time. You will get output as follow


Now, I am creating one Free style project and check for the slave usage


In project, I have defined execute shell method under build as follow. It will show message Test Slave and run for 25 Seconds to validate the stage

echo "Test Slave"
sleep 25


Now I am going to save and build the job. Here you can see job executed from slave as follow


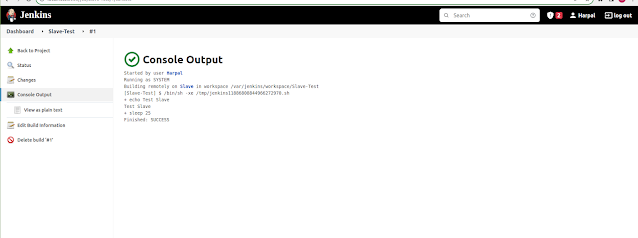
Also we can check output in console of the project as follow


Tuesday, May 17, 2022

Setup pipeline to Test, Build and Deploy java project on Tomcat using Jenkins

Description:  Here I have explained, how to setup pipeline to Test, Build and Deploy project for Tomcat using Jenkins.

Setup:

  1. Jenkins [Installed on Localhost]
  2. Tomcat9 Prod server [44.202.240.14]  
  3. Tomcat9 Staging server [100.27.26.171]
Required Jenkins Plugins
  1. Maven Integration Plugin 
  2. Build Pipeline Plugin
  3. Copy Artifact Plugin 
  4. Deploy to container Plugin 


Procedure: 

First I am going to install required plugins in Jenkins. To install the plugin navigate to Manage Jenkins --> Manage Plugins ---> Available  then search for first Build Pipeline plugin and install with restart


After installing Build Pipeline, Install Maven Integration plugin


Install Deploy to container Plugin


After installing all the require plugins, I am installing maven on jenkins. To install maven navigate to Manage Jenkins --> Global Tool Configuration, Under Maven installation --> click on add Maven as follow. If maven already installed we can defined path. But in our case we are going to install it. 


Install Copy Artifacts: Similar to other plugin install Copy Artifacts plugin


Setup Pipeline: After installing all the plugins and tool, Now I am going to create multiple pipeline for setup. Here I am going to create 4 Projects as follow:
  1. Project-Test                 == In this Project source code from git cloned and test using maven
  2. Project-Build               == In this Project build created after test
  3. Project-Deploy-Stage  == Here deploy build to staging environment with automatic
  4. Project-Deploy-Prod   == Here deploy build to Production environment by manual approval
Project-Test:  To create this project click on New Item give name Project-Test and select Maven Project and create as follow

Add Git source code link for maven testing 


Under Build Section goals and options put test apply and save


Project-Build: After test the project need to build the project, Creating maven project by copy setting from Project-Test build as follow


To build the project, I am using install command under build option as follow and apply- save the project


To setup java project, We need to archive project to .war file and archive this project to Artifcats. To perform this open Project-Build project navigate to Post-Build Actions

Archive the Artifacts --> Files to archive --> fill as follow --> Apply and save

**/*.war


After creating Build Project, Add build project as child project for Project-Test. To run build after test.
To add child project open Project-Test -- Navigate to configure --> Build Other Project --> Set Project-Build


Deploy Project:
After creating build project, I am going to create 2 Project one for staging and another for Production with free style as follow.

To create Deployment Project, navigate to New Item --> Define Name [Project-Deploy-Stage] --> Free style project --> apply and save.

Perform same step for Project-Deploy-Prod  project to deploy on production.

After creating both the deploy project, I am going to define Project-Deploy-Stage project as child project for Project-Build.  So it will run once project build completed as follow.


It looks as follow in Project-Deploy-stage.  It will automatically run after build project


Same way, I am going to define Project-Deploy-Prod project as child for Project-Deploy-Stage , but here I am adding manual approval for production. To perform this, open Project-Deploy-Stage project and navigate to configure --> Post-build Actions --> Build Other projects (manual step)


Copy Artifacts from Build  to Deployment Project:  We have created 4 Projects, now we are going setup copy artifacts plugin which we have installed at early stage and give permission to Project-Deploy-Stage and Project-Deploy-Prod projects to copy  the build from Project-Build

Open Project-Build project, navigate to configure --> Tick on Permission to copy Artifacts -->  Add Project-Deploy-*  entry because both Prod and stage project name started with Project-Deploy-


After provide permission, set copy-artifcats from another project in Project-Deploy-Stage project. To perform it open the project and Add build step --> Select copy artifacts from another project 

Fill details as follow:
Project Name : Project-Build 
Which Build: Latest Build

Apply and save the changes as follow


After copying artifacts, I am going to archive it to *.war for further [Project-Deploy-Prod] and deploy war file to container [deploy to staging tomcat instance] as http://100.27.26.171:8080 as http://100.27.26.171:8080/techserver application 

Note: Here /techserver is application name for java project in tomcat9 

To perform both the step, open Project-Deploy-Stage project and navigate to Post Build Actions

Select Files to Archive as follow

**/*.war


Add another post-deploy step --> Deploy to container fill details of tomcat environment and credentials


Add Container select Tomcat9  then fill below details 
War file : **/*.war
Context Path: /techserver   [ http://100.27.26.171:8080/techserver  it deployed app like this]
Add tomcat manager credentials as follow:


Then select the credentials of tomcat 


Create Pipeline View:
Now I am going to create pipeline view to get more picture on above defined stages. To create pipeline view navigate to Dashboard page and click on + symbol 


Select Project-Test as initial Job


Once we save pipeline, it looks as follow


Once you run the pipeline, it will start processing each linked project. First time it will take some time due to maven installation and configuration. After some time you can see the pipeline view as follow if any issue not found pipeline execution


We have setup upto Project-Deploy-stage Project, Now I am configuring tomcat server credentials  and war file copy from Project-Deploy-stage in Project-Deploy-Prod 

PROD Tomcat URL
: http://44.202.240.14:8080/ 


Apply and save Production project, Now I am going to run whole pipeline again, For Production we need to approve manually as we have defined early


Prod Application URL:  http://44.202.240.14:8080/techserver/


 Staging Application URL: http://100.27.26.171:8080/techserver/