Showing posts with label Github Action. Show all posts

Sunday, October 29, 2023

Setup Sonarqube on Ubuntu 22 and integrate it with Github

Description: In this tutorial, I have explained how to setup SonarQube on Ubuntu 22 and integrate it with GitHub

SonarQube: SonarQube is an open-source tool for code quality analysis. It can scan source code for potential bugs and vulnerabilities and generates a report which allows you to identify issues.

Prerequisites:

  • Ubuntu 22 with atlease 2 GB RAM and one CPU
  • User with sudo rights
  • Domain name to access the server using name
  • JDK
  • Postgres 


Install Open JDK

Install Open JDK 11 # apt-get install openjdk-11-jdk -y Verify the JDK version # java --version

Configure System for Sonarqube and PostgreSQL

Open /etc/sysctl.conf and add the below configuration
vm.max_map_count=262144 fs.file-max=65536 ulimit -n 65536 ulimit -u 4096

After add above configuration reboot the server 

Install and configure PostgreSQL

Setup PostgreSQL by following the below steps
sudo apt update -y sudo sh -c 'echo "deb http://apt.postgresql.org/pub/repos/apt/ `lsb_release -cs`-pgdg main" >> /etc/apt/sources.list.d/pgdg.list' wget -q https://www.postgresql.org/media/keys/ACCC4CF8.asc -O - | sudo apt-key add - sudo apt install postgresql postgresql-contrib -y sudo systemctl enable postgresql sudo systemctl start postgresql

Configure PostgreSQL user and database 

We are setting up the user and database for Sonarqube 

sudo passwd postgres su - postgres createuser sonar psql ALTER USER sonar WITH ENCRYPTED password ''; CREATE DATABASE sonarqube OWNER sonar; GRANT ALL PRIVILEGES ON DATABASE sonarqube to sonar; \q exit


Install and configure SonarQube

After setting up all the above things, now install and configure SonarQube. Follow below steps to install the same

sudo wget https://binaries.sonarsource.com/Distribution/sonarqube/sonarqube-9.8.0.63668.zip sudo unzip sonarqube-9.8.0.63668.zip sudo mv sonarqube-9.8.0.63668 /opt/sonarqube sudo groupadd sonar sudo useradd -d /opt/sonarqube -g sonar sonar sudo chown sonar:sonar /opt/sonarqube -R


Install SonarQube plugins 

cd /opt/sonarqube/extensions/pluginssudo wget https://github.com/mc1arke/sonarqube-community-branch-plugin/releases/download/1.14.0/sonarqube-community-branch-plugin-1.14.0.jar


Configure SonarQube properties 

Open the sonar.properties file and update the configuration as follow in  /opt/sonarqube/conf/sonar.properties


sonar.jdbc.username=sonar sonar.jdbc.password= sonar.jdbc.url=jdbc:postgresql://localhost:5432/sonarqube sonar.web.javaAdditionalOpts=-javaagent:/opt/sonarqube/extensions/plugins/sonarqube-community-branch-plugin-1.14.0.jar=web sonar.ce.javaAdditionalOpts=-javaagent:/opt/sonarqube/extensions/plugins/sonarqube-community-branch-plugin-1.14.0.jar=ce

sonar.web.host=0.0.0.0 ### if you want to access the sonar using external ip using port number

Setup SonarQube service: Create the service file for sonarqube under /etc/systemd/system and add below content on service file

# vi /etc/systemd/system/sonar.service

[Unit] Description=SonarQube service After=syslog.target network.target [Service] Type=forking ExecStart=/opt/sonarqube/bin/linux-x86-64/sonar.sh start ExecStop=/opt/sonarqube/bin/linux-x86-64/sonar.sh stop User=sonar Group=sonar Restart=always LimitNOFILE=65536 LimitNPROC=4096 [Install] WantedBy=multi-user.target

After the service file saved reload the daemon and start the service 

# systemctl daemon-reload
# systemctl start sonar
# systemctl status sonar


After performing all the tasks try to browse the URL using port 9000 

i.e : http://54.86.47.253:9000/ 


Default username and password 

Username: admin
Password: admin


After first login it ask to change the password 


We have setup the plugins so it shows warning for same so we can ignore it 


Home page of Sonarqube looks like as follow


Setup Nginx to access the URL with domain name and with SSL

First I have add A record for 54.86.47.253 IP with sonarqube.techserverglobal.shop


Install and configure Nginx with SSL


Install dependencies # apt install curl gnupg2 ca-certificates lsb-release ubuntu-keyring -y Import Nginx GPG signing key # curl https://nginx.org/keys/nginx_signing.key | gpg --dearmor \ | sudo tee /usr/share/keyrings/nginx-archive-keyring.gpg >/dev/null Add Nginx stable repository # echo "deb [signed-by=/usr/share/keyrings/nginx-archive-keyring.gpg arch=amd64] http://nginx.org/packages/ubuntu `lsb_release -cs` nginx" | sudo tee /etc/apt/sources.list.d/nginx.list Update the package repository # apt update Install nginx # apt install nginx Start nginx service # systemctl start nginx


Install SSL for Web and generate the ssl for domain

snap install core; sudo snap refresh core
# apt remove certbot
#  snap install --classic certbot
# ln -s /snap/bin/certbot /usr/bin/certbot
# certbot certonly --nginx --agree-tos --no-eff-email --staple-ocsp --preferred-challenges http -m Email_id  -d sonarqube.techservergloabal.shop


Certificate and key saved at given location


Create Nginx configuration for domain under /etc/nginx/conf.d location and paste the configuration 

# vi /etc/nginx/conf.d/sonar.conf

server { listen 80 default_server; server_name sonarqube.techservergloabal.shop; return 301 https://$server_name$request_uri; } server { listen 443 ssl http2; server_name sonarqube.techservergloabal.shop; http2_push_preload on; # Enable HTTP/2 Server Push ssl_certificate /etc/letsencrypt/live/sonarqube.techservergloabal.shop/fullchain.pem; ssl_certificate_key /etc/letsencrypt/live/sonarqube.techservergloabal.shop/privkey.pem; ssl_trusted_certificate /etc/letsencrypt/live/sonarqube.techservergloabal.shop/chain.pem; ssl_session_timeout 1d; ssl_protocols TLSv1.2 TLSv1.3; ssl_ciphers 'ECDHE-ECDSA-AES256-GCM-SHA384:ECDHE-RSA-AES256-GCM-SHA384:ECDHE-ECDSA-CHACHA20-POLY1305:ECDHE-RSA-CHACHA20-POLY1305:ECDHE-ECDSA-AES256-SHA384:ECDHE-RSA-AES256-SHA384'; ssl_prefer_server_ciphers on; ssl_session_cache shared:SSL:50m; ssl_stapling on; ssl_stapling_verify on; access_log /var/log/nginx/sonarqube.access.log main; error_log /var/log/nginx/sonarqube.error.log; location / { proxy_set_header Connection ""; proxy_set_header Host $http_host; proxy_set_header X-Real-IP $remote_addr; proxy_set_header X-Forwarded-For $proxy_add_x_forwarded_for; proxy_set_header X-Forwarded-Proto $scheme; proxy_http_version 1.1; proxy_pass http://127.0.0.1:9000; } }

After apply all the settings, Kindly restart the nginx and validate by browse the page 

i.e https://sonarqube.techservergloabal.shop/


Integrate SonarQube with GitHub: 

Create GitHub App: To create the GitHub App open the settings on your account and navigate to Developer Setting, click on Create New GitHub App


Fill the below details on form 

Github App Name: sonarqube
Homepage URL : https://sonarqube.techservergloabal.shop/
Permissions:  For permission check the URL


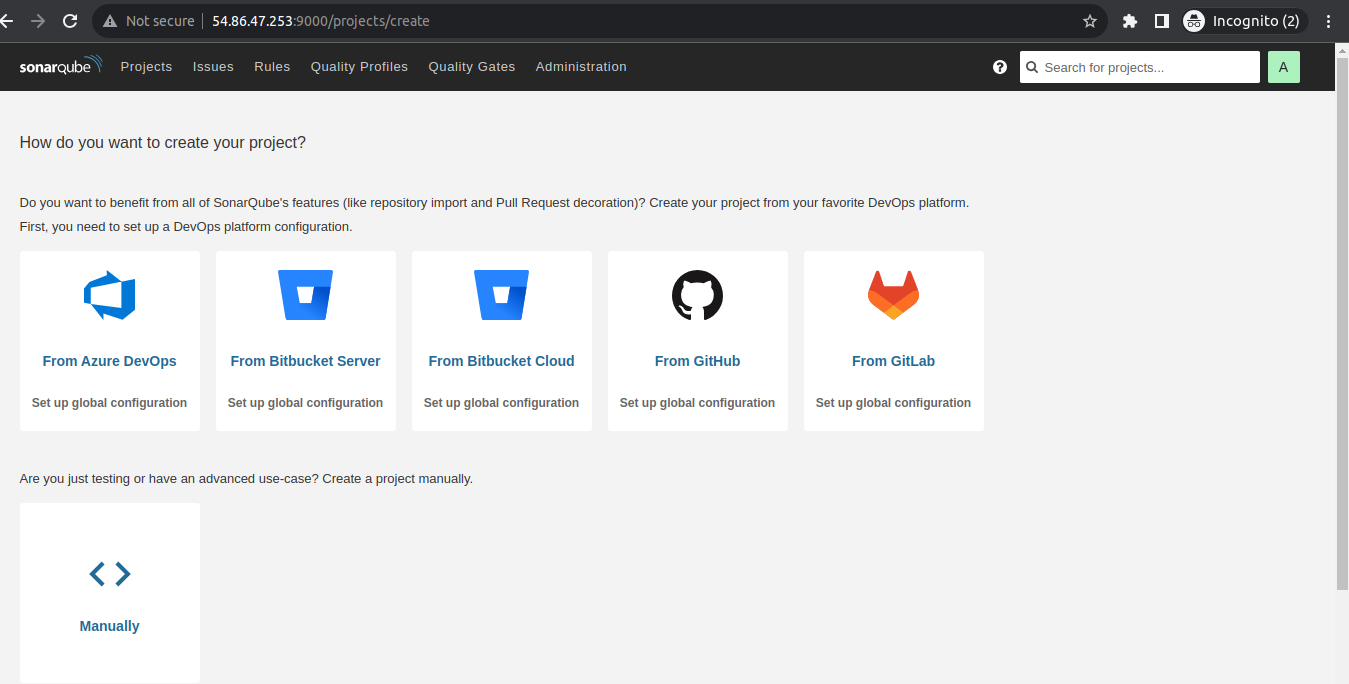
After create GitHub App navigate to Sonarqube console and click on from GitHub 

Fill all the required details as follow

Configuration Name:
GitHub API URL: https://api.github.com/
Client ID: You can find from the GitHub App page in github.com
Client Secret:  Generate from the GitHub
Callback URL:  https://sonarqube.techservergloabal.shop


Private Key : Generate private key from the GitHub Apps


After filled all the details click on save configuration. After save the configuration you will find the project in Sonarqube.


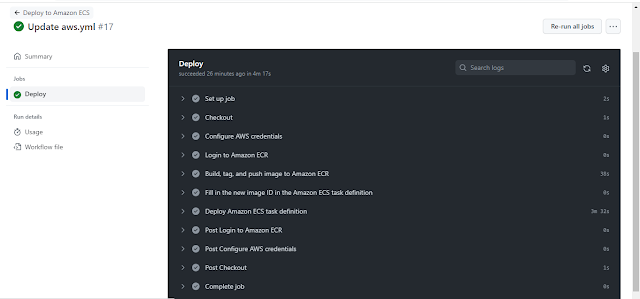
Here, I have use With GitHub Action and add the workflow and secrets with GitHub. After fill all the requirement, repository is started wit sonar scan and it shows output as follow


Sunday, October 15, 2023

Setup React Application on AWS ECS using GithubAction

Description: In this topic I have explained, how to create an automated flow that builds and deploys your React.js app to AWS ECS using GitHub Actions and Amazon Elastic Container Service. Once set up, you can push changes to the master branch, and the latest version of your app will automatically be deployed to the AWS ECS cluster. With this streamlined process, your app will be live on the internet and accessible to anyone in no time.


Setup React Project with Github:  The first thing we need to setup React Project with Github with Docker file.

Dockerfile

# Fetching the node image from the DockerHub FROM harpalgohilon/reactsample AS development # Declaring env ENV NODE_ENV development # Setting up the work directory WORKDIR /react-app # Installing dependencies COPY ./package.json /react-app RUN npm install # Copying all the files in our project COPY . . # Starting our application CMD npm start
hh

Pushed source  code to GitHub: Once the source code ready with the local system pushed to GitHub. Below is the GitHub repository link

https://github.com/harpal1990/reactrepo.git


Setting Up the Amazon ECR:  Login into AWS console and create the ECR to setup the repository


Give the name of the repository (public) and click on create repository


Setting Up Amazon ECS: After setup ECR, Search for the service called ECS to setup containers. First I am setting up Task Definition 


select the size of the Farget instance 1CPU and 3GB RAM


After creating the task definition open the definition and navigate to json tab and download the JSON file


JSON file looks like as follow


After download the file upload that file to project under .aws folder

i.e aws\React-Taskdefinition-revision3.json


After create the Task definition create the cluster


Create the Service:  After create the cluster and task definition, open the cluster and create the service with load balancer with port number 3000 on target group HTTP 3000. Also make sure to open port 3000 on security group


Select port 3000 as application as well external access and click on create 


It took some time to create the service.

IAM User for authorization: Create IAM user for authorization, To create IAM user navigate to IAM service and create user. Once user created assigned security credentials


After IAM user details downloaded configure secretes and variables in GitHub


AWS_ACCESS_KEY_ID   and AWS_SECRET_ACCESS_KEY     defined under secrets 

After adding above 2 secretes need to add some more secrets to use in yaml file with value as follow

MY_AWS_REGION = us_east_1
MY_ECR_REPOSITORY = techserverrepo
MY_ECS_SERVICE = react-service
MY_ECS_CLUSTER = reactcluster 
MY_ECS_TASK_DEFINITION = aws\React-Taskdefinition-revision3.json
MY_CONTAINER_NAME =  react


Setup GitHub action workflow: After update all the information. Now it's time to setup the workflow for Deploy to Amazon ECS


After click on configure it will create one yaml file for workflow. Replace yaml file with below yaml file

name: Deploy to Amazon ECS on: push: branches: [ "master" ] env: AWS_REGION: ${{ secrets.AWS_REGION }} ECR_REPOSITORY: ${{ secrets.ECR_REPOSITORY }} ECS_SERVICE: ${{ secrets.ECS_SERVICE }} ECS_CLUSTER: ${{ secrets.ECS_CLUSTER }} ECS_TASK_DEFINITION: ${{ secrets.ECS_TASK_DEFINITION }} CONTAINER_NAME: ${{ secrets.CONTAINER_NAME }} permissions: contents: read jobs: deploy: name: Deploy runs-on: ubuntu-latest environment: production steps: - name: Checkout uses: actions/checkout@v3 - name: Configure AWS credentials uses: aws-actions/configure-aws-credentials@v1 with: aws-access-key-id: ${{ secrets.AWS_ACCESS_KEY_ID }} aws-secret-access-key: ${{ secrets.AWS_SECRET_ACCESS_KEY }} aws-region: ${{ env.AWS_REGION }} - name: Login to Amazon ECR id: login-ecr uses: aws-actions/amazon-ecr-login@v1 - name: Build, tag, and push image to Amazon ECR id: build-image env: ECR_REGISTRY: ${{ steps.login-ecr.outputs.registry }} IMAGE_TAG: ${{ github.sha }} run: | # Build a docker container and # push it to ECR so that it can # be deployed to ECS. docker build -t $ECR_REGISTRY/$ECR_REPOSITORY:$IMAGE_TAG . docker push $ECR_REGISTRY/$ECR_REPOSITORY:$IMAGE_TAG echo "image=$ECR_REGISTRY/$ECR_REPOSITORY:$IMAGE_TAG" >> $GITHUB_OUTPUT - name: Fill in the new image ID in the Amazon ECS task definition id: task-def uses: aws-actions/amazon-ecs-render-task-definition@v1 with: task-definition: ${{ env.ECS_TASK_DEFINITION }} container-name: ${{ env.CONTAINER_NAME }} image: ${{ steps.build-image.outputs.image }} - name: Deploy Amazon ECS task definition uses: aws-actions/amazon-ecs-deploy-task-definition@v1 with: task-definition: ${{ steps.task-def.outputs.task-definition }} service: ${{ env.ECS_SERVICE }} cluster: ${{ env.ECS_CLUSTER }} wait-for-service-stability: true


After saving the file workflow will run automatically 


You can browse the url with load balancer url with port 3000


Now I have made some changes and push it to master branch


It will triggered the workflow as follow


Once the flow completed, you will find the updated details on URL


Friday, October 13, 2023

CI/CD pipeline in GitHub action and push to Docker image to docker-hub and publish application to vercel

Description: In this topic, I have explained how to setup CI/CD pipeline in GitHub action and push to Docker image to docker-hub and publish application to vercel


Goals: Below are the goals for this document

  • Building and publish the docker image to Docker-hub
  • Deploy updates to Vercel for every push and pull request
Check React Application in Local environment:  Whenever we setup CI/CD pipeline with any framework make sure application must test on local environment

I have setup local docker container using below Dockerfile

# Fetching the image from the dockerhub FROM harpalgohilon/reactsample AS development # Declaring env ENV NODE_ENV development # Setting up the work directory WORKDIR /react-app # Installing dependencies COPY ./package.json /react-app RUN npm install # Copying all the files in our project COPY . . # Starting our application CMD npm start


Below is the screenshot for application on localhost


Upload project source code to GitHub:  I have upload all source code include above stated Dockerfile in Github repository with .gitignore file

Github URL: https://github.com/harpal1990/reactrepo

.gitignore file 

/node_modules
/npm-debug.log
/.pnp
.pnp.js


Setup Workflow in GitHub Action:  To setup the CI/CD we are going to use GitHub Action workflow, which is platform of GitHub to automate the Deployment.

To setup the Github action navigate to Repository --> Actions button 


Search for Node.js and configure it 


Now paste below yaml file in place of auto-generated file 

# This is a basic workflow to help you get started with Actions name: React-Workflow # Controls when the action will run. on: # Triggers the workflow on push request events but only for the main branch push: branches: [master] # A workflow run is made up of one or more jobs that can run sequentially or in parallel jobs: # This workflow contains multiple jobs build_test: # The type of runner that the job will run on runs-on: ubuntu-latest strategy: matrix: node-version: [18.x] # Steps represent a sequence of tasks that will be executed as part of the job steps: # Checks-out your repository under $GITHUB_WORKSPACE, so your job can access it - uses: actions/checkout@v2 - name: setup node uses: actions/setup-node@master with: node-version: ${{ matrix.node-version }} # install applicaion dependencies - name: Install dependencies run: | npm install # build and test the apps push_to_Docker_Hub: # The type of runner that the job will run on runs-on: ubuntu-latest # build docker image and push to docker hub # only if the app build and test successfully needs: [build_test] steps: - name: checkout repo uses: actions/checkout@v2 - name: Set up QEMU uses: docker/setup-qemu-action@v1 - name: Set up Docker Buildx uses: docker/setup-buildx-action@v1 - name: Login to DockerHub uses: docker/login-action@v1 with: username: ${{ secrets.DOCKRUHUB_USERNAME }} password: ${{ secrets.DOCKERHUB_TOKEN }} - name: Build and push uses: docker/build-push-action@v2 with: context: ./ file: ./Dockerfile push: true tags: ${{ secrets.DOCKRUHUB_USERNAME }}/reactsample:latest - name: Run the image in a container uses: addnab/docker-run-action@v3 with: image: ${{ secrets.DOCKRUHUB_USERNAME }}/reactsample:latest run: | echo "runing the docker image" push_to_vercel: runs-on: ubuntu-latest steps: - uses: actions/checkout@v2 - uses: amondnet/vercel-action@v20 if: github.event_name == 'push' && github.ref == 'refs/heads/main' with: vercel-token: ${{ secrets.VERCEL_TOKEN }} vercel-org-id: ${{ secrets.ORG_ID}} vercel-project-id: ${{ secrets.PROJECT_ID}} vercel-args: "--prod"


Define below variables in GitHub

DOCKRUHUB_USERNAME = It is the username for docker image
DOCKERHUB_TOKEN = Token generated from Docker hub --> Account --> Security


Vercel Configuration: Below are the configuration for Vercel VERCEL_TOKEN : Generate Token from Vercel account using URL and add it under Github


ORG_ID and Project_ID: To get the vercel org id you need perform below activities 

Install vercel tool on system using below command

# npm i -g vercel

Run the vercel command from the project directory where your project is hosted
 # vercel 

It will asked for GitHub details to connect with the GitHub project 

After all the command run successfully you will find the ORG_ID under .vercel  folder project.json


After getting both the details kindly add both the variable on GitHub secrets. Now we can see 4 secretes added in GitHub

Note: Make sure all the things added under Secretes


Run the workflow by change in the source code:  After perform all the changes now I am changing in the source code from the local system and commit it to GitHub master branch.

So I changed the default message in src/App.js file as follow. So As far as I changed in file and commit it to master branch workflow will run automatically 


Same changes automatically applied to vercel application and image pushed to Docker Hub Image