Description: Here I have explained, How to deploy Dot net core application in Azure App service using Git source code repository with CI/CD pipeline with manual and automatic trigger.
Pre-requisites:
- Dotnet core sample application on Git Repo [harpal1990/VSCoreNew]
- Azure Application [In this example https://serverapprunner.azurewebsites.net]
Create Release pipeline in Azure Devops for Continuous Integration

Select the source code, for this example I am selecting github as my source code repo is uploaded on it

It will automatically list the repo from your link git account as follow, select your repository

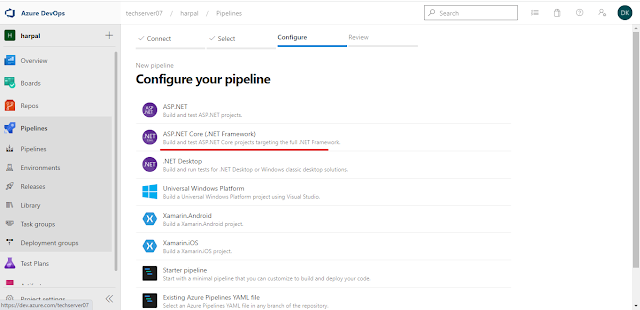
Select framework for pipeline deployment, Here I am use ASP.Net Core
It will generate azure-pipeline.yml file which include full deployment. In which I am removing test configuration from the bottom
Settings:
- task: VSTest@2
  inputs:
    platform: '$(buildPlatform)'
    configuration: '$(buildConfiguration)'
After removing testing configuration add Task for build the artifacts "Publish build artifacts"

Add artifacts on pipeline at bottom of yaml file

Your complete yaml file for pipeline looks like follow:
# ASP.NET Core (.NET Framework)
# Build and test ASP.NET Core projects targeting the full .NET Framework.
# Add steps that publish symbols, save build artifacts, and more:
# https://docs.microsoft.com/azure/devops/pipelines/languages/dotnet-core

trigger:
- master

pool:
  vmImage: 'windows-2022'

variables:
  solution: '**/*.sln'
  buildPlatform: 'Any CPU'
  buildConfiguration: 'Release'

steps:
- task: NuGetToolInstaller@1

- task: NuGetCommand@2
  inputs:
    restoreSolution: '$(solution)'

- task: VSBuild@1
  inputs:
    solution: '$(solution)'
    msbuildArgs: '/p:DeployOnBuild=true /p:WebPublishMethod=Package /p:PackageAsSingleFile=true /p:SkipInvalidConfigurations=true /p:DesktopBuildPackageLocation="$(build.artifactStagingDirectory)\WebApp.zip" /p:DeployIisAppPath="Default Web Site"'
    platform: '$(buildPlatform)'
    configuration: '$(buildConfiguration)'

- task: PublishBuildArtifacts@1
  inputs:
    PathtoPublish: '$(Build.ArtifactStagingDirectory)'
    ArtifactName: 'drop'
    publishLocation: 'Container'
Click on Save and Run to execute Release pipeline, Add your commit message and run


Now I am going to create Release pipeline for Continuous Deployment / Continuous Delivery
Continuous Deployment: It means once new changes in source code [as per yaml trigger] it will automatically deploy code on end infrastructure like Web APP, virtual machine or Docker container etc,
Continuous Deployment: It means once new changes in source code [as per yaml trigger] it will automatically deploy code on end infrastructure like Web APP, virtual machine or Docker container etc,
Continuous Delivery: It means once new changes in source code [as per yaml trigger] it will ask to deploy code on end infrastructure manually like Web APP, virtual machine or Docker container etc,
Navigate to Release and click on create New pipeline

Once you click on new pipeline, it ask for select template for deployment. So for this example I am selecting Azure App service deployment

Once you select Azure App, need to fill Azure Subscription and App name as follow and click on save

After click on save click on pipeline, to add the artifacts

Add artifacts for publish
This is manual trigger process for Continuous Delivery as I didn't use automatic trigger in artifacts. Click on create release

After click on create you will find some process for initial deployment

Once process will completed, you will get message like succeed as follow

Now browse the WebAPP url https://serverapprunner.azurewebsites.net/

Now change release /build pipeline from manual to automatic, Edit the pipeline and change the trigger from manual to automatic


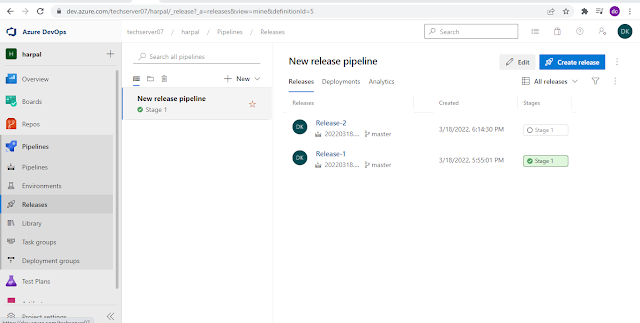
Click on save and create new release as follow

Now we can see 2 release for pipeline
Now, As I am changing on source code it will automatically changed on Web App as well. Change the index page as follow and commit the changes in source code.

After changes, you can see Integration pipeline running automatic and then build/release


No comments:
Post a Comment