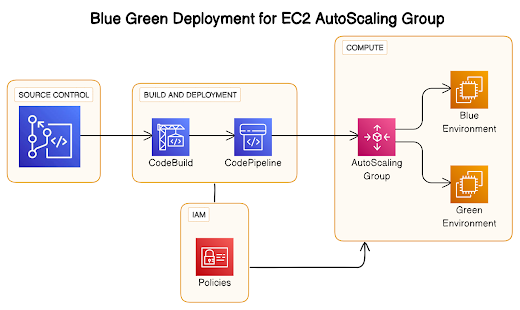
Description: In this blog, we'll walk through setting up a Blue Green deployment.Deployment strategy for an Angular application hosted on Amazon EC2 instances.
Blue-Green Deployment allows for zero-downtime updates, ensuring that users experience seamless transitions during application updates. This setup will leverage AWS services, including EC2, Auto-Scaling, Load Balancing, and Code Deploy.
When delivering an application traditionally, a failed deployment is usually fixed by redeploying an older, stable version of the application.
Due to the expense and time involved in provisioning additional resources, redeployment in traditional data centers often uses the same set of resources.
This strategy works, but it has a lot of drawbacks. Rollbacks are difficult to implement since they necessitate starting from scratch with a previous version.
Since this process takes time, the application can be inaccessible for extended periods of time. Even though the application is simply compromised, a rollback is necessary to replace the flawed version.
As a result, you are unable to troubleshoot the existing problematic program.
Blue-Green Deployment is an application release methodology in which you create two separate but identical environments. The traffic from the current version (blue environment) of an application or micro-service is transferred to a newer version(green environment), both of which are already in production.
After the green environment has undergone testing, the blue environment is deprecated, and actual application traffic is switched to the green environment.
The blue-green deployment methodology increases application availability and lowers deployment risk by simplifying the rollback process if a deployment fails.
Advantages of Blue-Green Deployment
It is challenging to validate your new application version in a production deployment while also continuing to use the older version of the program when using a traditional deployment with in-place upgrades.
Your blue and green application environments will be somewhat isolated thanks to blue/green deployments.
This makes sure that creating a parallel green environment won’t have an impact on the resources supporting your blue environment. The danger of deployment is decreased by this separation.
Role: Nginx
Install and start nginx, start the service
# apt update
# apt install -y nginx
# systemctl start nginx
# systemctl enable nginx
Create project directory
# cd /var/www
# mkdir my-angular
Change it in default document root
File: /etc/nginx/sites-available/default
Change root directory from
/var/www/html
TO
root /var/www/my-angular;
Install AWS code deploy agent in EC2 instance
[In this example I used Ubuntu image]
Below are the command to setup agent and service for code deploy
# apt update
# apt install -y ruby-full
# apt install wget
# cd ~
# wget https://bucket-name.s3.region-identifier.amazonaws.com/latest/install
For us-west-1 region url is as follow
# wget https://aws-codedeploy-us-west-1.s3.us-west-1.amazonaws.com/latest/install
Reference URL:
https://docs.aws.amazon.com/codedeploy/latest/userguide/resource-kit.html#resource-kit-bucket-names
https://docs.aws.amazon.com/codedeploy/latest/userguide/codedeploy-agent-operations-install-ubuntu.html
# chmod +x ./install
# sudo ./install auto
# systemctl start codedeploy-agent
# systemctl enable codedeploy-agent
Below is the Github project URL with appsepc.yml and buildspec.yml
appsepc.yml: The appspec.yaml file is used to specify the deployment actions to be taken by CodeDeploy, It is a crucial configuration file used in AWS CodeDeploy for defining the deployment actions and specifying how AWS CodeDeploy should manage the deployment process for your application. This file includes details about the files to be transferred, the destination of those files, and the lifecycle event hooks that allow you to run custom scripts at various stages of the deployment.
version: 0.0
os: linux
files:
  - source: dist/my-angular-project
    destination: /var/www/my-angular
permissions:
  - object: /var/www/my-angular
    pattern: '**'
    mode: '0755'
    owner: root
    group: root
    type:
      - file
      - directory
hooks:
  ApplicationStart:
    - location: deploy-scripts/application-start-hook.sh
      timeout: 300
buildspec.yml: It is is a configuration file used by AWS Code Build to define the build process for your application. This file specifies the commands to run during the build, including installing dependencies, running tests, and packaging the application. It also defines the artifacts to be produced and can include environment variables and other settings.
version: 0.2
phases:
  install:
    runtime-versions:
      nodejs: 12
    commands:
      - npm install -g @angular/cli@9.0.6
  pre_build:
    commands:
      - npm install
  build:
    commands:
      - ng build --prod
    finally:
      - echo This is the finally block execution!
artifacts:
  files:
    - 'dist/my-angular-project/**/*'
    - appspec.yml
    - 'deploy-scripts/**/*'
Step3: Setup Code Build Project for prepare build project and upload it to S3 bucket
To create the build project navigate to AWS Devleoper Tools --> Build --> Build Projects --> Create Project
After click on create project, fill all the require details, click on connect to Github to connect
After connect the Github, Click on webhook trigger "Rebuild everytime a code change pushed to the repository"
Set Environment for Build
Define buildspec configuration: we have already upload buildspec.yml in root path with repository, so here we only define the buildspec.yml file with same name
Artifacts: We are going to save artifacts into s3, So I have created one bucket to store the artifacts
Logs: We can stored build logs in cloudwatch and S3 bucket as well and click on create project
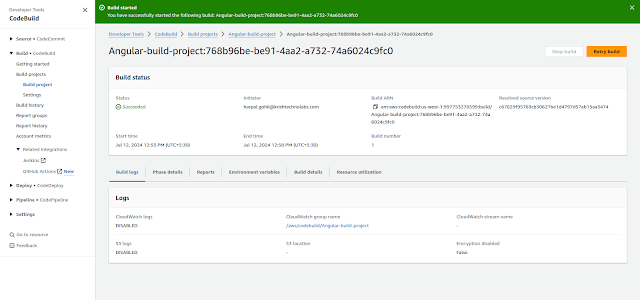
Once project created, test build by click on start build
Once build completed, you will get message as follow, also you will get build in s3 bucket as well
S3 Bucket
Step4: Create Application and Deployment Group in Code-deploy to deploy the application in EC2 instance
To create the application, navigate to CodeDeploy --> Create application
Fill name and Compute platform --> EC2/on-premise
After create application, Create deployment group and fill all the details
Service Role: CodeDeployEC2Role
Deployment type: In place
Environment Type: Amazon EC2 Instance, Also define Tag which we have setup while setting up the machine
[Note: Here we are applying in placed deployment on standalone machine without auto-scaling]
Define Deployment Setting: Deployment All at once, click on Create Deployment Group
Step5: Setup IAM role for EC2 Instance and attach it to EC2 instance
Create Role with below permission policies
- AmazonEC2FullAccess
- AmazonS3FullAccess
- AmazonEC2RoleforAWSCodeDeploy
- AWSCodeDeployRole
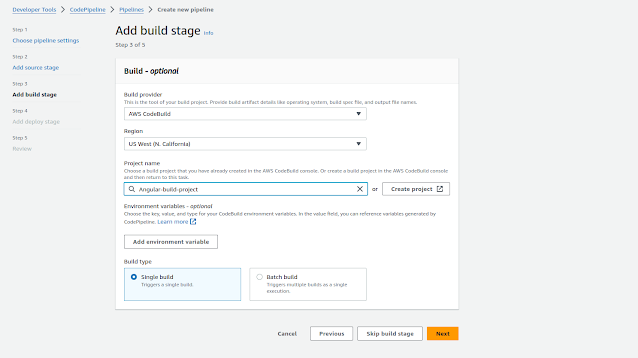
Review: Review the settings and click on create pipeline, Once you click on create it will create to run pipeline
Once the code pipeline executed, you can see the source code extracted to webroot path
Also we can validate by browse the public IP of EC2 instance
So this is how you can setup standalone EC2 instance with angular using code deploy pipeline.
In the next topics: we will setup code deploy In-placed and Blue Green deployment with auto-scaling and load balancer


No comments:
Post a Comment